Sunday, July 31, 2011

Chocolate and Raspberry Ice creams with Chopped Nuts

We've reached our first food from inside the Wizarding World! Hagrid buys Harry an ice cream while Harry gets fitted for his school robes, and we find out a page later which flavors the giant chose:

"Hagrid was standing there, grinning at Harry and pointing at two large ice creams to show he couldn't come in...Harry was rather quiet as he ate the ice cream Hagrid had bought him (chocolate and raspberry with chopped nuts)" (Sorcerer's Stone 78-79).

I love making ice cream! But because we're making two different types of ice cream, this delicious food item will take two days to complete (at least that's how things work with my ice cream maker), because you must re-freeze the chilling basin in between batches, which, to be safe, should take a minimum of six hours. For this delicious delicacy, I've decided to use Dinah Bucholz' recipe from The Unofficial Harry Potter Cookbook.

For the Chocolate Ice Cream, You Will Need:
2 cup whole milk
2 cup heavy cream
3/4 cup granulated sugar
2 Tbs unsweetened cocoa powder
8 oz bittersweet chocolate, melted and cooled
5 large egg yolks
1 tsp vanilla (with no proylene glycol in it!)
1 cup coarsely chopped bittersweet chocolate (i used mini semi-sweet chocolate chips)
a sieve
an ice cream maker


1. Combine the milk, heavy cream, sugar, and cocoa powder in a medium saucepan and cook, stirring frequently, until hot but not simmering.
2. Whisk the melted chocolate into the egg yolks (it will be thick difficult to whisk-- a fork might suit you better). Temper the egg yolk mixture by slowly pouring 1 cup (or more) of the hot milk mixture into the yolks while whisking/stirring vigorously and constantly.


3. Pour the yolk mixture into the saucepan of hot milk and cook, stirring constantly, until very hot but not simmering. Do not boil. It might be challenging, but try to get the yolk/chocolate to dissolve and combine with the milk.


4. Pour the mixture through a sieve (You MUST complete this step, as the mixture probably has some globs of chocolate still in it).


5. Stir in the vanilla extract.
6. Cover and chill until completely cold (not in your freezer though!).
7. Freeze in your ice cream maker according to the manufacturer's instructions.


8. Toward the end of the freezing time, add the chopped chocolate.


9. Transfer to an airtight container and freeze until you need it. Heads up, it gets REALLY hard in the freezer.

For the Raspberry Ice Cream, You Will Need:
12 oz fresh or frozen (and thawed) raspberries
3/4 cup granulated sugar
1 cup heavy cream
2 cups whole milk
4 large egg yolks (only 3 are pictures, because that's all I had left, so I was going to adjust the recipe accordingly, but then one of my eggs had two yolks! lucky me!)


1. Process the raspberries with 1/4 cup of the sugar in a blender or food processor until smooth. Note: after making this recipe, I found I would've like it to have some raspberry chunks; so I recommend reserving a small handful of berries to cut up and throw in while it's freezing.


2. Push the mixture through a sieve into a bowl with a rubber spatula, squeezing out as much liquid as possible. This might take awhile. Discard the solids.


3. Combine the heavy cream, milk, and remaining sugar in a medium saucepan and cook over medium heat, stirring frequently, until hot but not bubbling.


4. Temper the egg yolks by slowly pouring 1 cup of the hot milk mixture into the egg yolks while whisking constantly.
5. Pour the yolk mixture into the pot while whisking constantly.
6. Continue whisking over medium-high heat until the mixture thickens slightly but before it begins to boil.
7. Pour into a bowl (preferably one with an airtight lid) and whisk in the raspberry mix.


8. If you haven't yet, transfer to an airtight container and let it reach room temperature before chilling in the fridge until very cold (at least 6 hours).
8. Remove from fridge and whisk again, then freeze in your ice cream maker according to the manufacturer's instructions.


9. Transfer to an airtight container and place in freezer until ready to use.

Now you'll need your two ice cream flavors, and your favorite type of nuts (chopped into little pieces), and if you want them, ice cream cones!
Place a scoop of each flavor in your cone or a dish, and sprinkle (or roll the ice cream cone) with nuts. Delicious! Enjoy!

Friday, July 29, 2011

Sherry


What could be better than eating with Harry Potter?


Drinking with Harry Potter!


As readers of Harry Potter will know, when The Goblet of Fire comes around, we will associate Sherry with Professor Sybil Trelawney. But its first appearance is in the first book, during Harry's first visit to the Leaky Cauldron:

"A few old women were sitting in a corner, drinking tiny glasses of sherry" (Sorcerer's Stone 68).

Sherry is not usually the drink of choice in today's society (unless you're like Professor Trelawney and you pretend you're using it in your cooking). Sherry is, however, an ingredient in many delicious cocktails! Today we will make Banana Nutbread Cocktails, the recipe for which can be found here.

You Will Need:
1 oz Frangelico Hazelnut Liqueur
1 oz Creme de Bananes
1/2 oz Dry Sherry
1 Tbs Vanilla Ice Cream
ice
blender

1. Combine all the ingredients in a blender with a small handful of ice and blend until smooth-ish.

2. Pour into a cocktail glass and enjoy!


These are super delicious! I hope you like them! And remember to drink responsibly... reasonably responsibly anyway.


Thursday, July 28, 2011

Peppermint Humbugs

Peppermint humbugs are the next treat on our long list of Harry Potter foods. Funnily enough, they only appear in Harry Potter and the Sorcerer's Stone. The second time they appear is at the Start-of-Term feast, but the first time is the morning after Harry learns he is a wizard:

"Hagrid's coat seemed to be made of nothing but pockets-- bunches of keys, slug pellets, balls of string, peppermint humbugs, teabags... finally, Harry pulled out a handful of strange-looking coins"
(Sorcerer's Stone 62).

Can I just say that I love the name of this sweet? Traditionally they're black and white, but come in lots of colors today. Apparently they're a bit of a joke in Britain, but they taste pretty good, and are the first candy I've succeeded in making 100% correctly (yay!). Also, it would be really easy (and much more attractive) to split this recipe in half and color it two different colors to be twisted together, like Dinah Bucholz suggests. It is her recipe that I'm using today.

You Will Need:
1/3 cup water
1 cup granulated sugar
1/4 tsp cream of tartar
1/4 tsp peppermint extract
food color of your choice 
Cooking spray

1. Spray an 8"pan (I used a bread loaf pan, which worked fine) with cooking spray and set aside.
2. In a small-medium saucepan, combine the water, sugar, and cream of tartar, and cook over medium-high heat, stirring constantly, until the sugar is dissolved and the mixture has started to boil. If sugar crystals form on the sides of the pan, use a pastry brush dipped in water to wash them down.
3. Place a andy thermometer in the pan. Reduce the heat to medium and cook, stirring occasionally, until the temperature reaches 260 degrees.


4. Remove the pan from the heat and stir in the peppermint extract and food color. Mix well.
5. Pour the syrup into the prepared pan and let cool for a few minutes.


6. (If you have a low tolerance to heat, wear heavy rubber gloves, oiled with cooking spray for this step) Oil your hands with cooking spray and pick up the candy. Begin pulling and twisting, folding in half often and as necessary. This might be difficult at first, as the texture will still be a squishy glob.


7. Repeat over and over, pulling, twisting, folding. Eventually it will become opaque and shiny.


8. When the candy is too stiff to fold/twist/pull anymore, snip the rope at 3/4" intervals (with scizzors you can wash/don't mind getting sticky). The candies will look like teeny little pillows. Don't let the candies touch each other, as they are still very sticky.


9. Cut pieces of parchment paper (or commercially-produced candy wrappers) into squares and use them to wrap the candies individually. Store in an airtight container. Apparently after 2-3 days, they will fully recrystallize. 

And enjoy! They make pretty delicious little breath-minty candies!

Wednesday, July 27, 2011

Sausages


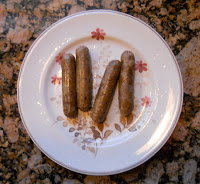
"The giant sat back down on the sofa, which sagged under his weight, and began taking all sorts of things out of the pockets of his coat: a copper kettle, a squashy package of sausages..."
(Sorcerer's Stone 48).

Hagrid does ask for a cup of tea before we learn that he has a package of sausages in his pocket, but we've already talked about tea! Which means that our next new item to make is sausage!

There are multiple kinds of vegetarian sausage products to choose from, and the ones I've tasted are all delicious. Of course, you could go whole-hog (sorry, I had to) and make your own sausages, but that involves all kinds of work and finding a place that sells vegan casings... no thank you. Hagrid cooks his sausages over the fire on a poker:

"Nobody said a thing while the giant was working, but as he slid the first six fat, juicy, slightly burnt sausages from the poker, Dudley fidgeted a bit"(Sorcerer's Stone 48).

If you want to cook your sausage camping-style like Hagrid, I recommend using one of the sausage creations by Light Life. They are delicious and large enough to accommodate being stuck with a poker. If you'd prefer the microwave or skillet option, you might want to try Morningstar Farms' Sausage Links. They're excellent. And since I don't really have access to a campfire here in suburbia (and it's one of the hottest weeks of the year here in Michigan), I'm  going with Morningstar Links in the microwave. Easy.

You Will Need (like stated above):
Your preferred sausages

1. Place your desired number of sausages on a plate or skillet and cook according to directions on the package.
2. Enjoy your sausages!

Tuesday, July 26, 2011

Large Sticky Chocolate Cake

We have reached our first Hagrid-made delicacy in the Harry Potter series! And finally some kindness for poor Harry!

"Inside was a large, sticky chocolate cake with Happy Birthday Harry written on it in green icing"
(Sorcerer's Stone 48).

It is the perfect time for Harry's birthday cake to appear on our list, as Daniel Radcliff's birthday just passed us by on July 23rd, and Harry Potter will turn 31 on July 31st! His golden birthday! Very exciting, even if he is a fictional character.

Since I'm not really a cake afficionado, I decided to use the recipe in The Unofficial Harry Potter Cookbook for "Harry's First Birthday Cake."And I have to say, for the first time, I'm disappointed in the results. The cake itself is excellent, but the frosting and glaze are not great. I'll go into further detail when we get there.

For the Cake, You Will Need:
3/4 cup boiling water
1/2 cup unsweetened cocoa powder
1 tsp instant coffee
1 cup all-purpose flour
1 tsp baking powder
1/4 tsp salt
1 stick butter, at room temperature
1/2 cup packed dark brown sugar
3 large eggs, at room temperature
1 tsp vanilla

1. Preheat oven to 350, and grease and flour two 8" round cake pans. If you like, line the pans with parchment paper.
2. Whisk together the boiling water, cocoa powder, and instant coffee in a small bowl until smooth and set aside.

3. In a separate bowl, whisk together the flour, baking powder, and salt, and set aside.
4. In a large bowl, beat the butter and sugars with an electric mixer until light and fluffy, scraping the sides down as needed (this will take at least 5 min).
5. Add the eggs one at a time, beating after each until incorporated.


6. Add the vanilla and beat until combined.
7. Add the hot cocoa mixture and beat until combined, scraping down sides as needed.


8. Add the flour mixture and mix on the lowest speed until combined.
9. Divide the mixture between the two prepared cake pans and bake for 20 minutes, until a toothpick inserted in the center comes out with a few crumbs attached. Be careful, because this cake burns easily.


10. Cool the in the pans for 10 minutes, then invert onto a wire rack to cool completely.


For the Glaze, You Will Need:
8oz chopped bittersweet chocolate
3/4 cup heavy cream
1/4 stick (2Tbs) butter
1/4 cup corn syrup

1. Place the ingredients in a bowl and microwave for 1-2 minutes


2. Whisk until smooth, and cool until thick but still pourable.


Notes about the "Glaze:" This recipe yields not so much a glaze as a glob. I did use it at its original consistency when adding it to the frosting recipe, but before "pouring" it onto the cake at the end, I added another generous squeeze of corn syrup and probably almost another 1 1/2 cups of heavy cream. And a taste test confirmed that it was SUPER bitter (which is not surprising, since there's definitely not enough corn syrup to counteract 8oz of bitter chocolate), so I added a bit of powdered sugar too. If the consistency was actually that of a glaze, I would've had no problem with the bitterness, but pouring an almost 1 inch thick layer of bittersweet chocolate on top of this cake was a major downfall for me.

For the Frosting, You Will Need:
1 stick butter
1 cup confectioner's sugar
1 Tbs heavy cream
1 tsp vanilla
1/2 of the chocolate glaze recipe


1. Place butter, confectioner's sugar, heavy cream, and vanilla in a large mixing bowl and beat until light and fluffy, scraping down sides as needed (it'll take 5+ minutes).


2. Add half the cooled glaze and beat until combined. 


3. If frosting is too soft to spread (mine sure was!), chill in the fridge at 10 minute intervals, beating in between until you like the consistency. Note: Even after chilling, this is a very soft frosting. It won't ever reach the consistency of frosting out of a can.


For the Green Icing, You Will Need:
1 Cup Confectioner's Sugar
Green Food Coloring
Water to make a paste

1. Place the sugar in a small bowl, and add VERY SMALL amounts of water at a time, stirring in between, until you make a paste. Don't add too much water, or you'll have to add more sugar. Add your desired amount of food color and stir to combine.
2. Pour/scrape icing into a pastry bag (or ziplock bag, then cut off a tiny corner).

To Assemble the Cake:
1. Place one cake layer top-side down on a plate or cardboard round, and spread 3/4 cup (estimate) of frosting over the cake to the edges.


2. Place the second layer top-side up over the first, and spread the remaining frosting over the top and sides of the cake.
3. "Pour" remaining glaze over the top of the cake and allow it to drip unevenly over the sides. This part definitely didn't work for me, even after all my additions. But since it's a cake based on Hagrid's, the messy craziness of the finished product was okay with me.


4. Write your message on top of the cake with your green icing-filled pastry bag.


Enjoy this Ultra-Chocolatey Layer Cake! Hopefully you have better luck than I did!


Monday, July 25, 2011

Bananas


Bananas are my absolute favorite fruit. I eat them as a snack, on cereal, with peanut butter... I could go on and on. So I'm very excited that today's food is, you guessed it, bananas.

"Uncle Vernon's rations turned out to be a bag of crisps each and four bananas"
(Sorcerer's Stone 44).

It would be easy to say you should just grab a banana, peel it, and chow down. Which, of course, is probably what poor starving Harry did out in the shack on the rock with his miserable family. But I have always wanted to try my hand at Bananas Foster, and this seems to be the perfect opportunity! 

Obviously a dessert from New Orleans has nothing at all to do with Harry Potter... 

...except that bananas are the main ingredient. 

So there. 

That's my justification and I'm sticking to it! 

I found this recipe on the website for Brennan's, which is the restaurant in New Orleans where the dish originated. Looking for a really easy dessert that will really impress your friends? Make Bananas Foster. You won't be disappointed.

You Will Need:
1/4 cup (1/2 stick) butter
1 cup brown sugar
1/2 tsp cinnamon
1/4 cup banana liqueur
4 bananas (I couldn't fit more than 3.5 in my pretty large skillet though)
1/4 cup dark rum
Vanilla Ice cream

Side Note: Can anyone tell me why my photo of the ingredients has gotten corrupted for the last several recipes?? It's usually the first photo I take when I turn on the camera... any thoughts?

1. Peel the bananas and slice them in half lengthwise, and then in half crosswise.


2. Melt the butter in a flambe pan over low heat (any pan that can deal with fire is fine), and immediately add the sugar and cinnamon. Stir until sugar "melts" (mine didn't so much melt as combine into a paste).


3. Stir in the banana liqueur (this is the point at which my sugar seemed to actually dissolve), and place the bananas in the pan.


4. When the banana sections begin to soften and brown (the browning will be difficult to see, as the part of the bananas below the syrup will brown faster), carefully add the rum.


5. When the rum is heated (happens pretty quickly), ignite the rum. This can be done multiple ways. If you are using a gas stove, tip the pan slightly and the flame will ignite it. If not, use a long-stem lighter or matches (be careful!).


6. When the flames subside (mine only burned for a second), lift the bananas out of the pan and serve with a scoop of vanilla ice cream, drizzled with the extra syrup from the pan.


Soooo delicious! I hope you love it! Yay bananas!