Sunday, August 14, 2011

Licorice Wands

We've made it to the last item in our very long list of treats aboard the Hogwarts Express!

"What she did have were Bertie Bott's Every Flavor Beans, Drooble's Best BLowing Gum, Chocolate Frogs, Pumpkin Pasties, Cauldron Cakes, Licorice Wands, and a number of other strange things Harry had never seen in his life" (Sorcerer's Stone 101).

I imagine that Licorice Wands in the Wizarding World probably perform a fun charm or two before you eat them. Alas, the ones we make today are just delicious, not magical. Several Internet sites provide recipes for licorice wands, but the ones I've seen are all the same recipe, down to the photo documentation, and are from Betty Crocker. They include sprinkles, but I think that detracts from the wand-ish-ness of the candy, so I didn't use any sprinkles.

You Will Need:
a bag of licorice (black or red, whichever you prefer)
Melting chocolate (white, milk, dark, whatever you fancy)
Ideally you should also have shish kabob skewers, but it works without them too.


1. Melt the chocolate in the microwave at 30 second intervals and stir until smooth (Wilton melts take 1 min).
2. Roll one end of a licorice piece in the melted chocolate until coated.


3. If you have skewers, cut off a small piece of the uncoated end of licorice, and feed the skewer into it. Place the skewer in a glass so the chocolate can melt without getting smashed. If you're like me, and you thought you had skewers at home, but discovered that you were mistaken, you can lay the licorice wands on a parchment sheet to harden. They just won't be quite as pretty, because one side will be flattened.


3. After the chocolate has hardened, enjoy your delicious licorice wands! They're quite tasty!


Saturday, August 13, 2011

Cauldron Cakes

"What she did have were Bertie Bott's Every Flavor Beans, Drooble's Best Blowing Gum, Chocolate Frogs, Pumpkin Pasties, Cauldron Cakes, Licorice Wands, and a number of other strange things Harry had never seen in his life" (Sorcerer's Stone 101).


Along with Pumpkin Pasties, Cauldron Cakes are the thing Harry seems to eat most when on the Hogwarts Express. But we have no real clue as to what exactly they are. Dunah Bucholz interpreted them as pancakes in her cookbook, which does stand to reason since Harry often buys "stacks" of them. But why would a wizard make pancakes in a cauldron? At The Wizarding World of Harry Potter, Honeydukes sells pastries shaped like cauldrons and calls them Cauldron Cakes. And they are really delicious (but like lots of things there, are almost painfully sweet). The Internet is rife with recipes for Cauldron Cakes, and while several of them look delicious, they don't quite fit what I have in my imagination. So today, I am making up my own recipe for Cauldron Cakes!

You Will Need
A box of Devil's Food Cake Mix (yes, cake mix is kind of cheating, but it costs $3 instead of the $20 that ingredients would cost to make it from scratch!)
Vegetable Oil
3 Eggs
Water
2/3 cup butterscotch pieces or chips
2 Tbs dark rum
3 egg yolks
1/4 cup sugar
4 egg whites
dash of salt
dash cream of tartar
3/4 cup heavy cream (not pictured)
chocolate chips or melting chocolate


1. Make your devil's food cake according to the manufacturer's instructions, pour into cupcake pans, and bake for a couple minutes less than manufacturer recommends (the cupcake pans cook faster than cake pans).


2. While the cupcakes are baking, prepare your butterscotch mousse! Melt the butterscotch, either in the microwave or with a double boiler. Stir until smooth.
3. Stir in the rum and let the mixture cool a little bit (mine was cool enough by the time I needed it).

4. Beat the egg yolks with the sugar and combine with the butterscotch mixture.
5. Beat the egg whites until foamy, then add the dashes of salt and cream of tartar.
6. Beat the egg whites until firm (but not stiff) peaks form.
7. Beat a little of the egg whites into the butterscotch to loosen, then pour the butterscotch mixture into the egg whites and mix gently but completely.


8. Whip the cream until soft peaks form and fold into the butterscotch mixture, mixing completely.


9. Put in the fridge to chill.
10. When the cupcakes are done, turn them out on a wire rack to cool.
11. The bottoms are the tops with cauldron cakes! When cool, use a sharp knife at an angle to cut a hole out of the bottom of the cupcake, hollowing out the center without poking any holes in the sides or bottom.


12. Use a teaspoon to fill the hollow cupcakes with the butterscotch mouse. There should be enough mousse to fill them to the very top. Place the filled back in the fridge at every opportunity so the mousse keeps chilling.


13. Melt your chosen chocolate. Note on melting chocolate: On a whim, I bought a bag of Wilton's Melting Chocolate at a craft store, and it is the best choice ever! It melts so much better than chocolate chips, and you can re-melt over and over, and you can melt it right in the bag and use it as a pastry tube. Genius.
14. Use a pastry bag with a small tip (or just cut the corner off a plastic bag) and pipe little cauldron handles on a piece of parchment paper. Check to see how wide your cupcake tops are and use that as a size guide.


15. Pipe a ring of melted chocolate around the top of your cauldrons.


16. When your handles have hardened, apply them to the tops of your cauldrons, using melted chocolate as adhesive.


How cute are these?? They are the perfect dessert to serve at a Halloween party (even if it's not Harry Potter themed!). And they are SOOO delicious. Quite possibly my favorite thing to appear on In the Kitchen With Harry Potter so far.

Enjoy!!

Tuesday, August 9, 2011

Pumpkin Pasties

Pumpkin pasties are my absolute favorite thing to make from The Unofficial Harry Potter Cookbook! Which means we're finally back to food items that I can successfully make! Yay! Just in case you forgot (even though you've seen the sentence four times now), here is where we currently are on Harry Potter's journey:

"What she did have were Bertie Bott's Every Flavor Beans, Drooble's Best Blowing Gum, Chocolate Frogs, Pumpkin Pasties, Cauldron Cakes, Licorice Wands, and a number of other strange things Harry had never seen in his life" (Sorcerer's Stone 101).

Technically the recipe in Dinah Bucholz' book is for Cypress Pasties, which are basically little individual pumpkin pies (and are also super delicious). I've always wanted to make up a recipe for more Cornish-style pumpkin pasties, but that would involve a pumpkin, which are definitely not in season. Someday I'll do that, but for now--

For the Crust, You Will Need:
1 1/4 cup flour
1 Tbs granulated sugar
1/4 tsp salt
5 Tbs cold butter, cut into chunks
3 Tbs vegetable shortening, chilled and cut into chunks
4-6 Tbs ice water

For the Filling, You Will Need:
1 cup canned pumpkin (not pumpkin pie filling)
1/4 cup granulated sugar
1/8 tsp ground nutmeg
1/8 tsp ground cinnamon
Note: Every time I've made these, I've always had filling leftover. Even when I've doubled the dough recipe. So don't worry if you seem to have too much filling.


1. Place the flour, sugar, and salt in the bowl of a food processor and pulse a few times to combine. You can use a bowl and electric mixer if you want, but the food processor makes it SO easy!
2. Scatter the butter and shortening over the flour mixer and pulse about 15 times until the mixture resembles coarse crumbs, with no white powdery bits.
3. Transfer the mixture into a large mixing bowl. Sprinkle 4 Tbs cold water over the mixture and toss together with a spatula (or your hands) until it starts clumping together. If it's too dry, add more water 1 Tbs at a time (better too wet than too dry).
4. Gather the dough into a ball and pat into a disk. Wrap it in plastic wrap (or put in a gallon ziploc bag) and refrigerate for at least 1 hour (or overnight).
5. Combine the pumpkin, sugar, nutmeg, and cinnamon in a mixing bowl. Mix well.
6. Preheat the oven to 400 degrees.
7. Roll out the dough on a floured surface to about 1/8" thick. Use a saucer or the mouth of a mug or small bowl as a guide to cut out 6" circles.


8. Put 2-3 Tbs of filling in the center of each circle (that much has never fit into my circles!) of dough. 


9. Moisten the dough circle edges with water, fold the dough over the filling, and crimp the edges with a fork to seal the edges. Cut slits to make vents.


10. Bake on an ungreased cookie sheet for 30 minutes or until browned.

They're super delicious! I hope you enjoy them while imagining your speeding along on the Hogwarts Express!

Monday, August 8, 2011

Chocolate Frogs

Following Drooble's Best Blowing Gum on the list of things sold off the Hogwarts Express Trolley is Chocolate Frogs:

"What she did have were Bertie Bott's Every Flavor Beans, Drooble's Best Blowing Gum, Chocolate Frogs, Pumpkin Pasties, Cauldron Cakes, Licorice Wands, and a number of other strange things Harry had never seen in his life" (Sorcerer's Stone 101).

I wish I could say I am making Chocolate Frogs today. They are ultra-easy; but I do not own frog molds :-( Someday I will buy some and then I will make my own Chocolate Frogs and post pictures. But for now, here is how it works.

You Will Need:
Your favorite flavor chocolate chips (dark, milk, white, butterscotch, etc)

1. Melt your chocolate chips in a microwave-safe bowl in the microwave at 30 second intervals, and stir until smooth.
2. Pour the melted chocolate into the molds.
3. Let the chocolate harden.
4. Pop the chocolate frogs out of their molds and enjoy!


Sunday, August 7, 2011

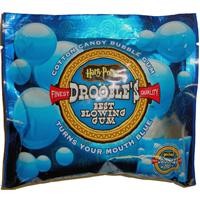
Drooble's Best Blowing Gum

The next item in the list of sweets for sale on the Hogwarts Express cart is Drooble's Best Blowing Gum:

"What she did have were Bertie Bott's Every Flavor Beans, Drooble's Best Blowing Gum, Chocolate Frogs, Pumpkin Pasties, Cauldron Cakes, Licorice Wands, and a number of other strange things Harry had never seen in his life" (Sorcerer's Stone 101).


Unfortunately, a major ingredient when making chewing gum is gum base. Gum base is not cheap. And since this is probably the only time I will ever make gum, I will not be purchasing gum paste, which seems to only be available in large quantities. Also required is citric acid, which is also difficult to find for sale.

So if you would like to make your own bubble gum, a pretty simple recipe can be found here (where you can also purchase the specialty ingredients required), but I will not be making any bubble gum myself.

I suggest that you go to the check-out aisle of your favorite market and buy some.

...at least that's what I'd do. Sorry to disappoint!

Bertie Bott's Every Flavor Beans

Hooray for a magical treats! We have reached a sentence that will take us a little while to get through:

"What she did have were Bertie Bott's Every Flavor Beans, Drooble's Best Blowing Gum, Chocolate Frogs, Pumpkin Pasties, Cauldron Cakes, Licorice Wands, and a number of other strange things Harry had never seen in his life (Sorcerer's Stone 101).

It never really occurred to me that jelly beans could be made at home. I could only find a couple recipes of how to make them (all can be found at e-how.com). The one I chose was pretty much a disaster. Perhaps the others yield better results. Clearly the correct choice is to simply buy some. Perhaps your local Hogwarts Express Trolley Lady can sell you some. But for now, here is my attempt to make jelly beans. 

You Will Need:
1 1/2 cups (plus 1/2 cup) water
2 1/2 cups (plus 1 cup) sugar
1/2 oz plain gelatin
1/2 tsp salt
1 cup your favorite juice (with any pulp filtered out)
cornstarch
vegetable oil
jelly bean molds or cookie sheets (you really do need some kind of mold)
candy thermometer

1. In a medium to large saucepan, combine 1 1/2 cups water, 2 1/2 cups sugar, and the gelatin, and cook over medium heat, stirring constantly, and slowly bring to a boil.


2. Continue cooking, stirring constantly, until the mixture reaches 240 degrees. (The recipe says 230, but that is the point at which syrup forms threads, not a soft ball. And since I went with 230, and my jelly beans were a disaster, I'm guessing that may have been a contributing factor.). 
3. When the temperature reaches 240, place the pan in a large bowl of ice to stop the temperature from increasing any further. 
4. Immediately stir in your juice and the salt. The recipe recommends that you add some lemon juice to give your chosen flavor some zip (I didn't). Allow the mixture to cool.

5. Pour the cooled mixture into your (greased with vegetable oil) chosen mold. I don't have jelly bean molds, so I used truffle molds and tried to make enormous jelly beans.


6. This is the point at which things turned disastrous for some reason. You should let the jelly beans sit for 4-6 hours. The recipe does not say to put them in the fridge. After 10 hours, they were still jelly. Then I put them in the fridge. 10 more hours later, they were more solid... but not so much like jelly beans as like gummy bears. The recipe suggested sprinkling them with cornstarch to help them dry out.


7. The candies need to be coated so they have an outer shell. The easy way to do this is with a candy-coating attachment on a kitchen mixer. I don't have one of those. The other way is with a pot with a lid and very burly arms. Put the gummies in the pot with 1/2 cup water and 1 cup sugar and pop the lid on. Then, holding the pot at an angle and holding the top on, swirl it so that the beans swirl around the pot with the sugar.

8. Unfortunately, this did not turn my gummies into candy-coated jelly beans. It turned them to mush.


Soooo, yeah. You're supposed to keep swirling until the moisture is absorbed, and then put them in the fridge for 3 hours to harden. At which point, you should apparently have jelly beans.

...or you could just go buy some.

Thursday, August 4, 2011

Mars Bars

Due to my poor listing skills, today we shall back up a paragraph or three, to Harry's excitement about buying sweets on the Hogwarts Express:

"He had never had any money for candy with the Dursleys, and now that he had pockets rattling with gold and silver he was ready to buy as many Mars Bars as he could carry-- but the woman didn't have any Mars Bars" (Sorcerer's Stone 101).

That's right! We're making homemade Mars Bars! I warn you now, these are dangerously delicious!! I got the recipe from here, and it's a lot easier than you might think!

You Will Need:
2 cups granulated sugar
1/4 cup light corn syrup
1/2 cup water
pinch salt
2 egg whies
2/3 cup (or less) almonds
35 caramels
2 Tbs water
24 oz milk chocolate chips (I only used 11oz)
candy thermometer


1. In a medium saucepan, combine the sugar, corn syrup, and 1/2 cup water. Bring to a boil, stirring occasionally, and cook until the temperature reaches 260-290 degrees (I went with about 270).


2. While that is heating, beat your egg whites in a medium-large bowl until stiff peaks form (if you have a nice stationary mixer with bowl schpiel, this is the time to use it!
3. When the syrup is ready, pour it into the egg whites in a continuous stream, while beating on low continuously. You can stop if you need to scrape the syrup out of the pan, but try not to. Keep mixing until the nougat becomes a soft dough (could be about ten minutes).


4. Press the nougat into a lightly greased 9x9" pan (mine was 7x7 I think). Pour on the almonds and press into the nougat (I used less than indicated by the recipe). Pop the pan in the fridge until the nougat is firm.

5. Unwrap the caramels and place in a microwave safe bowl with 2 Tbs water. Carefully melt the caramels in the microwave (30-sec intervals is good) and stir until smooth.


6. Pour the caramel over the nougat and almonds and smooth with a knife so it's even. Place in the fridge to solidify. Be sure the pan is FLAT in the fridge, because even a tiny slope will cause problems!


7. Melt the chocolate chips in a bowl in the microwave and stir until smooth.
8. The recipe technically says to cut the caramel-nougat layers into squares, dip them in the chocolate, and let them harden on a parchment sheet. I tried this once, and it's a big mess. So I decided to pour the melted chocolate over the hardened caramel and put it back in the fridge to harden for an hour or so.


9. Cut up the Mars Bars into squares (a little messy) and enjoy! Store in parchment paper inside an airtight container or ziplock bag (in the fridge is wise). 


Yummy! In my house, half the bars were gone within an hour. Enjoy!